Now that we’ve discussed both bridges and VLANs in detail in previous posts, we can put things all together building a virtual network for our VMs that contains multiple VLANs on the same machine. There are many ways we can do this, and in this post I’ll show you a couple options I’ve seen and what I ended up landing on for my homelab setup.
To recap our goals, we want to build a network that:
- Resides on a single machine hosting multiple virtual machines, hosted on KVM/QEMU and managed with
libvirt. - Allows these VMs to connect to eachother as well as the wider network
- Allows for machines to be tagged with different VLANs for isolation. In our examples these are VLAN 1 (default) and VLAN 30.
Let’s look at a couple options.
Linux Networking
One common method that you’ll find for building this type of network uses only native linux networking tools, namely linux network bridges, as well as linux sub-interfaces. In linux, sub-interfaces are logical channels attached to the standard network interface, and conveniently they can be used to separate traffic tagged on different VLANs.
For our purposes we can attach these sub-interfaces to our trunked network interface to logically separate our VLAN 1 and VLAN 30 traffic. Then, in order to make an interface that libvirt can readily connect our VMs to, we create separate bridges for each sub-interfaces. In this way, each bridge only handles traffic from a single VLAN. The result is something that looks like this:
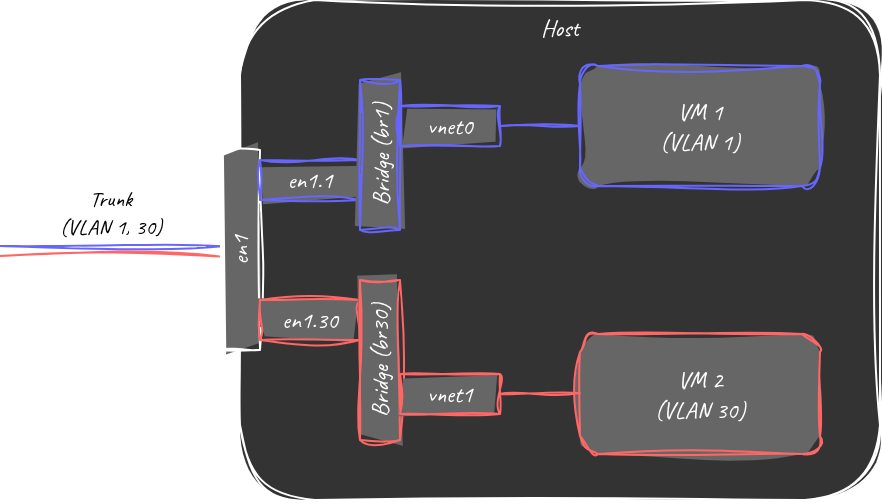
Network diagram with native Linux tools
… Yuck. Although we have the benefit of building our networking stack entirely with standard linux tools (everything here can be done with NetworkManager), we end up with a design that is much harder to maintain and much less extensible. For example, any time we want to add a new VM on a different VLAN, we have to create a new sub-interface AND a new bridge associated with that sub-interface.
Luckily, there is a simpler way!
Open vSwitch
Open vSwitch is an open source networking switch designed specifically for use with virtualized environments. When I first began seeing references to Open vSwitch I dismissed it as excessive for my use case, but in the end I came around to it because the alternatives were simply too unwieldy. Admittedly, Open vSwitch is WAY more capable than what I’m using it for here. Among it’s capabilities:
- Can act as both a layer 2 and layer 3 switch, providing control both over bridging and routing.
- Supports Virtual Extensible LAN (VXLAN) tunneling, allowing layer 2 tunneling over layer 3 networks.
- Fine-grained quality of service (QoS) control
- Lots of other things that I frankly don’t understand.
But the primary draw of Open vSwitch for me was that it is supported by libvirt for creating VLAN access port connections, driven only by the VM specification. The result is a network that looks like this:
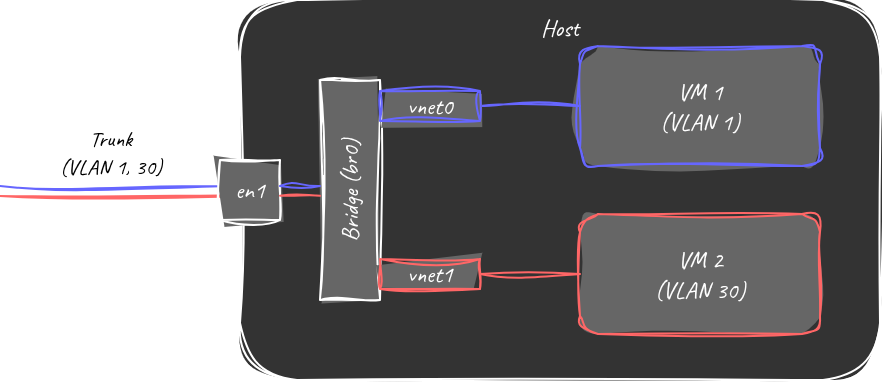
Network diagram with Open vSwitch
Much better! No need for multiple bridges to support multiple VLANs, and each additional VLAN can be added simply by configuring the access port generated by libvirt to connect to the Open vSwitch bridge.
Configuration
For my Ubuntu system, all I needed to do to install Open vSwitch was install via:
$ sudo apt install openvswitch-switch
This will install the Open vSwitch systemd service, as well as the command line tool ovs-vsctl, which is the primary way we can configure Open vSwitch. To begin, we create our bridge and connect it to our external network interface:
$ ovs-vsctl add-br br0
$ ovs-vsctl add-port br0 en1
Note that when working with native Linux tooling like NetworkManager, it’s crucial that we make sure that the bridge was “VLAN Aware” before moving on. Luckly for us, Open vSwitch bridges support VLANs by default!
So we can charge on and update our VM configurations to use this new bridge. This is as simple as updating the interfaces in our xml configuration to use a new virtualport tpe, and when necessary specify our VLAN tags. For our default VLAN VMs:
<interface type='bridge'>
 <source bridge='br0'/>
 <virtualport type='openvswitch'/>
 ...
</interface>
And for our non-default VLAN VMs we can simply add our VLAN tags:
<interface type='bridge'>
 <source bridge='br0'/>
 <vlan> <tag id='30'/> </vlan>
 <virtualport type='openvswitch'/>
 ...
</interface>
And that’s it! Let’s start our VMs and check out our interfaces. In my case the two VM domains I’m looking at are called storage and proxy. Using virsh we start them:
$ virsh start storage
Domain 'storage' started
$ virsh start proxy
Domain 'proxy' started
$ ovs-vsctl show
feb91a55-c2b7-4068-ac38-5763c71d447f
    Bridge br0
        fail_mode: standalone
        Port en1
            Interface en1
        Port vnet0
            Interface vnet0
        Port vnet1
            tag: 30
            Interface vnet1
        Port br0
            Interface br0
                type: internal
    ovs_version: "3.3.4"
On startup, we see have two new interfaces populated into our virtual switch, vnet0 and vnet1, in addition to our physical interface en1. And see that now vnet1 interface shows our tagged VLAN 30! All done just by configuring our virtual machines via libvirt.
Making Things Persistent
One last item that’s really more of a nicity is adding our Open vSwitch bridge to be created on boot using netplan. This is specific to Ubuntu, in redhat distributions there are actually Open vSwitch plugins for Network Manager that handle this for you.
To create our Open vSwitch bridge on boot, we add this to a file /etc/netplan/10-ovs.yaml (or similar):
network:
  version: 2
  renderer: networkd
  ethernets:
    en1:
      dhcp4: no
  bridges:
    br0:
      dhcp4: yes
      interfaces: [en1]
      openvswitch: {}
Then we run sudo netplan apply to apply our changes. This configuration will ensure that the bridge is created at boot, adds our external interface to the bridge, and enables DHCP on the bridge. This allows us to use br0 as a route for our host to get to the wider network.